Tuesday, September 15, 2015

Bohemian Polish Flash Dry


Earlier this summer I picked up a bottle of Bohemian Polish's quick dry topcoat, Flash Dry. I hadn't used it yet because I had plenty of HK Girl left but swatching the Moste Potente Potions collection* seemed an appropriate time to bust out my bottle and put it through its paces. I must say that I am extremely impressed with it. It provides me with the same resin-like protection that HK Girl does and seems to dry just as quickly. Flash Dry goes on ever so slightly thinner than HK Girl so I might prefer HK Girl over polishes with more texture like glitters and reserve Flash Dry for holos, shimmers, and cremes since I am usually too lazy to use something like Gelous.


SpaceCat is very enthusiastic about Flash Dry topcoat

My exceptional klutziness provided a couple of opportunities for Flash Dry to prove its mettle. When I was wearing Don't Mind the Steam, I was preparing dinner and the knife I was using to cut an onion with slipped and hit the tip of my thumbnail. While it chipped the polish, my nail itself was fine and I think that if I had been using a lesser topcoat it would have sliced the nail as well. Also, shortly after applying the Flash Dry to my See No Dreams manicure, my updo loosened itself and I had to remake it. As I was gingerly replacing one of the metal pins in my hair, rather than slide it through the hair I was holding in place I jammed it into my nail because I am the epitome of grace. I was certain that I had destroyed the polish. I cussed, looked at the finger (my ring finger), and was happy to see only the faintest ding. It absolutely would not have been necessary to redo that nail if I hadn't been doing swatch shots.


I had to experiment to find an angle that would even show the ding!


I wore my See No Dreams manicure for 5 days and saw only tip wear. I had no chipping on either hand which was amazing for me. The only issue I had was on the same ring finger I dinged with the hairpin. I woke up the day after applying my polish and it had wrinkled slightly during the night. I think it may have been due to my not waiting long enough between coats when I was applying the polish since I was redoing just that one finger. Despite that, I give the Flash Dry topcoat my highest recommendation.  I presume that topcoats, like polish, are somewhat dependent on body chemistry but for me personally Flash Dry is a wonderful option from a great indie maker. I will still be using my HK Girl for many of my manis just because I have well over half of my large refill container left and I do prefer the thicker coating for polishes with any degree of texture. But for smooth polishes, I will be quite happy using Flash Dry from here on out.


Day 1


Day 5

You can pick up your own bottle of Flash Dry quick-dry topcoat from Bohemian Polish's etsy store. While you are there be sure to check out the Moste Potente Potions collection, and use the code WANDCORE for 20% off your purchase.


*You can check out my swatches of some of the polishes in the Moste Potente Potions collection over on my Instagram account, @alphabootoo


Wednesday, July 22, 2015

HBP Presents Starry Night Sky

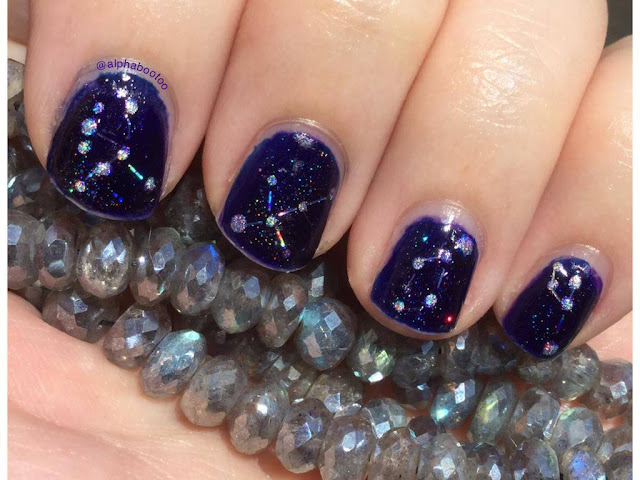
I am in the 'Hobby Polish Blogger' Facebook group. They do a themed blog link up every month and I decided to finally try joining in. The theme for July is Starry Night Sky which was too enticing for me to resist. I decided to get literal with the theme and create constellation nail art featuring the Summer Triangle which is blazing in the sky overhead this time of year.


From index to pinkie finger I painted Aquila, Cygnus, Lyra, and Delphinus. Since all I have to work with are nubs, Cygnus had its wings clipped and is more accurately the Northern Cross. The constellations aren't perfect but I think they are at least recognizable and I am happy overall with how things turned out. One thing I am less than happy with is the shrinkage I have at my tips, which is something I haven't really experienced before but that I attribute to the sheer number of layers of polish that went into creating this manicure.


I started with a base of Enchanted Polish Regal and then topped it with OPI Color Paint in Indigo Motif. I topcoated that with HK Girl to help it set because the OPI seemed to stay soft for quite a while after painting and I ended up smudging one nail and having to redo a second. I then topped them with a coat of Enchanted Polish Instant Galaxy which is very aptly named and did a wonderful job of approximating a stellar background. I used Urban Outfitters Silver Holo and a dotting tool to place the stars of my constellations. I had the "bright" idea of using the holographic bar glitter in Zoya Electra as the lines creating the constellation figures and soon regretted it because it ended up taking hours of tedious effort that failed more often than it succeeded. Finally however, I had a manicure that reminded me of the start charts I used to teach myself the heavens when I was young. I topped it with yet more HK Girl and found it almost too shiny to photograph so I tried a matte topcoat instead but that looked awful.  I did a final layer of HK Girl and worked to find photographic angles that minimized glare. The topcoats caused some bleeding of the base colors that turned several of my stars blue so I went over them again with more silver holo. Whew!! I think this may have been the most labor intensive manicure I have ever done. But I do like the end result. 


These nails are ridiculously sparkly and holographic in the sunlight. The bar glitters are small enough that they sort of shift in and out of visibility which is a really neat effect. The microglitters from Instant Galaxy lend another touch of realism, particularly given that the Milky Way runs through the Summer Triangle so it is rich with background stars.

I'm glad I finally decided to tackle one of these themed link ups. It pushed me outside my comfort zone and while I wasn't quite anticipating how much time I would put into the manicure I have had a lot of fun admiring the star chart that is literally at my fingertips.


Saturday, July 18, 2015

Indigo Bananas - Neon the 10th Element

My blog! It lives!! Well, okay, we've been here before and it never seems to last but let's not dwell on that and just enjoy this special moment together, shall we? I confess that I have been two-timing with that Instagram hussy but she asks so little of me compared to Blogger, and I appear to be a lazy lacquerista (but not THE Lazy Laquerista, who is lovely and talented and does blog regularly so you should all go follow her at http://www.thelazylaquerista.com ). 

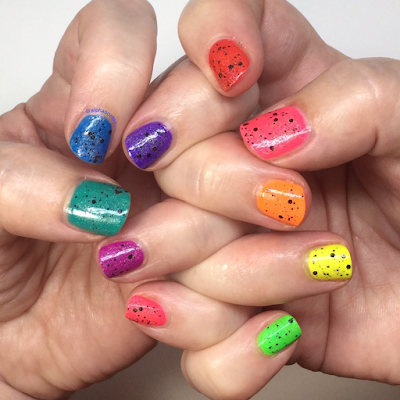
So what, you ask, has bestirred me to knock the cobwebs off my keyboard and return to blogging? Well, that would be the amazing neon collection that Andrea over at Indigo Bananas has released. It is called the "Neon, the 10th Element" collection and every name is a delightful wordsmash of the periodic table of the elements and the movie The Fifth Element - does that give anyone else warm fuzzies or just me? It includes Rhubidium Rhod (neon red), LiLoo (LithiumLoo) (neon orange), Sulfur Green (neon green), The Uranium Evil (neon yellow), Diva Plumbum (neon teal), Carbon Dallas (neon blue), Phlogiston Paradise (neon purple), Zinc Industries (neon purple/magenta), and Neon, the 10th Element (neon pink).

The colors are phenomenal. The yellow, orange, pink and green are intense neons - they look just like the ink from the highlighters that I tore through while I was in school. Because of that my poor camera freaked out and was unable to capture their true intensity. But trust me - highlighter ink. 


They dry to a marvelous rubber finish. I have an example here where I was painting a base for some nail art that failed so they may have benefitted from an additional coat on some colors and there is no cleanup but ignore all that and check out the glorious rubbery-ness of Carbon Dallas, Phlogiston Paradise, The Uranium Evil and Rhubidium Rhod:
Rubbery!

I ended up settling on a skittles manicure to showcase all the colors in the collection. I then topped them with Spotted Snow by Ethereal Lacquer - a topcoat with holo pigment and black dot glitter. The resulting manicure is pure 1980s fun. 

I destroyed the delightful rubber finish by adding the Spotted Snow and a final topcoat of HKGirl. Oh well. Shiny!

I call this pose "spaghetti fingers"

See, I told you they were a perfect match for highlighter colors!

I don't watermarble but The Polished Perspective did a comparison of several of the neon indie collections that have come out this year and determined that the Indigo Bananas neons are the best of the creme formulas that she tested as far as watermarbling is concerned. 

There are three additional non-neon polishes in the collection - a lovely light grey holo called Aether Or and two flakie mixes, Mul-Ti-Pass and Earth, Wind & Fire. Like all Indigo Bananas polishes, the collection is available in both full size bottles and generously sized 8mL minis. Head over to the Indigo Bananas website and check them out! 


Wednesday, September 24, 2014

Enchanted Polish Hot Chocolate For Unicorns

Enchanted Polish recently had a restock where she rereleased three beautiful polishes from last fall - Autumn, To Die For, and Vampire's Suck - as well as one new offering, Hot Chocolate For Unicorns. The name is word play off of two of her previous polishes, Hot Chocolate and Water For Unicorns. HCFU is a beautiful milky brown with linear holo and is indeed very reminiscent of a mug of cocoa.

I have two coats on here with no top coat. It applied beautifully and to be honest I could easily have gotten away with only one coat. (edited to add: I ended up using one coat on my non-swatching hand and I can't tell the difference)

Indirect daylight

sunlight
I don't generally wear a lot of browns but this one is very nice and would pair well with a number of other colors too. It is perfect for autumn.

Enchanted Polish is sold on her Big Cartel site as well as through international distributors such as MeiMei Signatures but you have to be quick - they sell out in a flash. 

Thursday, June 26, 2014

Enchanted Polish Display with swatch rings

Hey guys! I know it has been forever since I last posted but things have been hectic with Bear, the Epileptic Wonder Dog. Anyway, I just posted a picture to Facebook of my new Enchanted Polish display rack and people seem interested in how I did it so I thought I would do a quick explanation. As you probably know, my Enchanteds are exceptionally precious to me. One of the big problems I have with wall racks for polish is that light can degrade polish pigments over time. But since the Enchanteds are in boxes, I figured it would be reasonably safe to display them in a wall rack. However, it made for a relatively unexciting display. So I decided that I would devise a way to show them off, as well as making it much easier to find a given color out of the sea of boxes.

  First of all, here is the rack:
Sorry it is so dark - there is a large shade tree blocking a lot of the light to this room

To make the swatch rings, you need swatch rings (duh) which can be obtained from eBay or Amazon (they usually come from Asia so be prepared for a wait while they ship); paper clips, wooden toothpicks, and glue (I used E6000 adhesive). 


Start by squeezing out a small dollop of adhesive onto a disposable surface like a paper plate. Pick up a tiny amount with the edge of a toothpick. You may need to twirl it like a fork of spaghetti to break it free of the main pool of adhesive.


Apply a layer of the adhesive to the right hand top edge of the swatch ring from about the 2 o'clock to 4 o'clock position
Naked nails - eek!


Lay your paper clip on top of the swatch ring such that the largest round edge is laying in the adhesive (see photo).


Use a new toothpick to smooth the adhesive over the end of the paper clip and embed it in the adhesive fully. Try to keep the adhesive on the top surface of the swatch ring. Gluing your swatch ring to the paper plate or other swatch rings is counterproductive ;)


Step away from the swatch ring. Leave it alone until it has dried - I generally leave it overnight. Once it has cured it is ready to paint and attach to your box! 


The Enchanted boxes have two styles - the older plain boxes open in the front and the newer holo boxes open in the back. The back open ones in particular can't be opened with the swatch ring on - it needs to be slid into place from the side. Using your nail to pull up on the inside curve of the paper clip ever so slightly can open it up and help ease the swatch ring onto the lid. 


So there you have it! I have used this for a number of other boxed polishes like Femme Fatale, NailNation3000 and ILNP as well. Let me know what you think in the comments!


Wednesday, April 23, 2014

WingDust These Broken Wings

A number of bloggers are declaring #WingDustWednesdays so I figured I would join in the fun. I recently received a bottle of These Broken Wings, "a soft lavender sometimes periwinkle toned base, aqua/rose shimmer, silver flecks, iridescent flakes, linear holo, and 12 kt white gold leaf". So many of my favorite things collected in one beautiful bottle! 

I generally do standard 5 finger manicures but when I deviate, I tend to refer to different manicure styles after the friends that I associate with those styles. In this case, painting the middle and ring finger differently than the other three is something often done by the brilliant and talented woman behind Polished Pathology, and so I refer to this style as a Jenne mani. If by some chance you have not yet started following her, I suggest you do so immediately. Her polishing and photography skills are exceptional, and her write-ups are a delight. 

Today I chose to pair These Broken Wings with Enchanted Polish's Ice Castle over a base of Zoya Carey. I thought the blue/purple color shifting glass fleck in Ice Castle would compliment the colors and shimmer in These Broken Wings. 


I am wearing 3 thin coats of These Broken Wings and 2 coats of Zoya Carey topped with one coat of Ice Castle, all on top of CND Stickey and topped with HK Girl topcoat. The WingDust is ever so slightly bumpy on my thumb but I suspect that was an application error since it is the only nail to not lay flat. 


In sunlight the holo in Ice Castle comes strongly to the forefront and changes the appearance of the polish significantly.


I really love the look of this manicure. Soft greys and purples are among my very favorite colors and the visual interest provided by the color shifting qualities of the glass fleck, the iridescent flakes, the shimmer and holo make these polishes fascinating to look at on the nail. 

WingDust Collection polishes are available on etsy although the store is currently closed. They can be tough to obtain but These Broken Wings was made available as a preorder last time (along with its sister polish, Steel Town Girl). Enchanted Polish is available from various stockists as well as the Enchanted Big Cartel site but they are in very high demand and sell out quickly. You can sign up for email notifications about restocks on the Big Cartel site. Zoya can be purchased at some retail outlets as well as online at zoya.com. They are currently running their annual Earth Day promotion which lets you exchange your old nasty dried up bottles of polish for new Zoyas for half price (but there is a minimum of 6 and a maximum of 24, see the link for full details).

Saturday, April 19, 2014

A brief disclaimer

I have not been very active here on the blog but those of you who follow me on Facebook know that we recently adopted a dog. He is a special needs dog and the experience has been considerably more involved than we anticipated, leaving me very little spare time. Sadly, it has also meant that I have been subjecting my hands to exposure and neglect, and they are much the worse for wear. My cuticles are in horrendous shape and my nails are not much better. I am choosing to start posting again anyway and hope that you can look beyond the ragged skin and even less-perfect-than-usual nails in favor of the attributes of the polishes themselves.