Wednesday, September 24, 2014

Enchanted Polish Hot Chocolate For Unicorns

Enchanted Polish recently had a restock where she rereleased three beautiful polishes from last fall - Autumn, To Die For, and Vampire's Suck - as well as one new offering, Hot Chocolate For Unicorns. The name is word play off of two of her previous polishes, Hot Chocolate and Water For Unicorns. HCFU is a beautiful milky brown with linear holo and is indeed very reminiscent of a mug of cocoa.

I have two coats on here with no top coat. It applied beautifully and to be honest I could easily have gotten away with only one coat. (edited to add: I ended up using one coat on my non-swatching hand and I can't tell the difference)

Indirect daylight

sunlight
I don't generally wear a lot of browns but this one is very nice and would pair well with a number of other colors too. It is perfect for autumn.

Enchanted Polish is sold on her Big Cartel site as well as through international distributors such as MeiMei Signatures but you have to be quick - they sell out in a flash. 

Thursday, June 26, 2014

Enchanted Polish Display with swatch rings

Hey guys! I know it has been forever since I last posted but things have been hectic with Bear, the Epileptic Wonder Dog. Anyway, I just posted a picture to Facebook of my new Enchanted Polish display rack and people seem interested in how I did it so I thought I would do a quick explanation. As you probably know, my Enchanteds are exceptionally precious to me. One of the big problems I have with wall racks for polish is that light can degrade polish pigments over time. But since the Enchanteds are in boxes, I figured it would be reasonably safe to display them in a wall rack. However, it made for a relatively unexciting display. So I decided that I would devise a way to show them off, as well as making it much easier to find a given color out of the sea of boxes.

  First of all, here is the rack:
Sorry it is so dark - there is a large shade tree blocking a lot of the light to this room

To make the swatch rings, you need swatch rings (duh) which can be obtained from eBay or Amazon (they usually come from Asia so be prepared for a wait while they ship); paper clips, wooden toothpicks, and glue (I used E6000 adhesive). 


Start by squeezing out a small dollop of adhesive onto a disposable surface like a paper plate. Pick up a tiny amount with the edge of a toothpick. You may need to twirl it like a fork of spaghetti to break it free of the main pool of adhesive.


Apply a layer of the adhesive to the right hand top edge of the swatch ring from about the 2 o'clock to 4 o'clock position
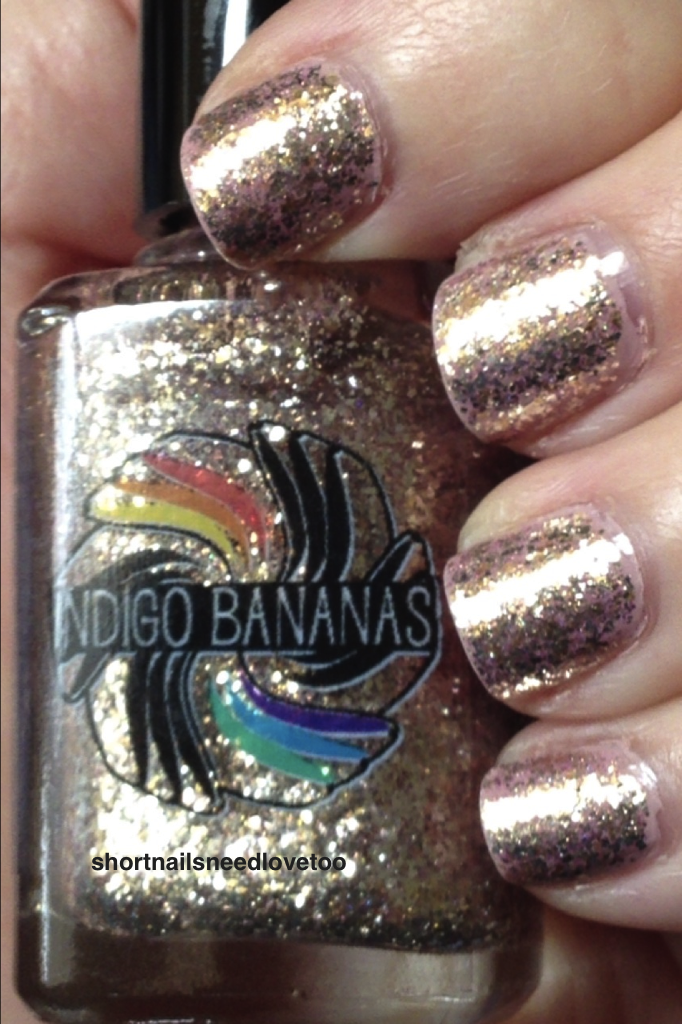
Naked nails - eek!


Lay your paper clip on top of the swatch ring such that the largest round edge is laying in the adhesive (see photo).


Use a new toothpick to smooth the adhesive over the end of the paper clip and embed it in the adhesive fully. Try to keep the adhesive on the top surface of the swatch ring. Gluing your swatch ring to the paper plate or other swatch rings is counterproductive ;)


Step away from the swatch ring. Leave it alone until it has dried - I generally leave it overnight. Once it has cured it is ready to paint and attach to your box! 


The Enchanted boxes have two styles - the older plain boxes open in the front and the newer holo boxes open in the back. The back open ones in particular can't be opened with the swatch ring on - it needs to be slid into place from the side. Using your nail to pull up on the inside curve of the paper clip ever so slightly can open it up and help ease the swatch ring onto the lid. 


So there you have it! I have used this for a number of other boxed polishes like Femme Fatale, NailNation3000 and ILNP as well. Let me know what you think in the comments!


Wednesday, April 23, 2014

WingDust These Broken Wings

A number of bloggers are declaring #WingDustWednesdays so I figured I would join in the fun. I recently received a bottle of These Broken Wings, "a soft lavender sometimes periwinkle toned base, aqua/rose shimmer, silver flecks, iridescent flakes, linear holo, and 12 kt white gold leaf". So many of my favorite things collected in one beautiful bottle! 

I generally do standard 5 finger manicures but when I deviate, I tend to refer to different manicure styles after the friends that I associate with those styles. In this case, painting the middle and ring finger differently than the other three is something often done by the brilliant and talented woman behind Polished Pathology, and so I refer to this style as a Jenne mani. If by some chance you have not yet started following her, I suggest you do so immediately. Her polishing and photography skills are exceptional, and her write-ups are a delight. 

Today I chose to pair These Broken Wings with Enchanted Polish's Ice Castle over a base of Zoya Carey. I thought the blue/purple color shifting glass fleck in Ice Castle would compliment the colors and shimmer in These Broken Wings. 


I am wearing 3 thin coats of These Broken Wings and 2 coats of Zoya Carey topped with one coat of Ice Castle, all on top of CND Stickey and topped with HK Girl topcoat. The WingDust is ever so slightly bumpy on my thumb but I suspect that was an application error since it is the only nail to not lay flat. 


In sunlight the holo in Ice Castle comes strongly to the forefront and changes the appearance of the polish significantly.


I really love the look of this manicure. Soft greys and purples are among my very favorite colors and the visual interest provided by the color shifting qualities of the glass fleck, the iridescent flakes, the shimmer and holo make these polishes fascinating to look at on the nail. 

WingDust Collection polishes are available on etsy although the store is currently closed. They can be tough to obtain but These Broken Wings was made available as a preorder last time (along with its sister polish, Steel Town Girl). Enchanted Polish is available from various stockists as well as the Enchanted Big Cartel site but they are in very high demand and sell out quickly. You can sign up for email notifications about restocks on the Big Cartel site. Zoya can be purchased at some retail outlets as well as online at zoya.com. They are currently running their annual Earth Day promotion which lets you exchange your old nasty dried up bottles of polish for new Zoyas for half price (but there is a minimum of 6 and a maximum of 24, see the link for full details).

Saturday, April 19, 2014

A brief disclaimer

I have not been very active here on the blog but those of you who follow me on Facebook know that we recently adopted a dog. He is a special needs dog and the experience has been considerably more involved than we anticipated, leaving me very little spare time. Sadly, it has also meant that I have been subjecting my hands to exposure and neglect, and they are much the worse for wear. My cuticles are in horrendous shape and my nails are not much better. I am choosing to start posting again anyway and hope that you can look beyond the ragged skin and even less-perfect-than-usual nails in favor of the attributes of the polishes themselves.


Wednesday, April 2, 2014

Emerald and Ash Aurora

Emerald and Ash recently released their Photometry Collection, based on the colors created by various light phenomena. As a lifelong sky gazer and science geek I am so excited for these polishes that I can hardly see straight. There are 5 colors in all and they are fabulous. So strap in as I go full-on excitable girl and start gushing!

Aurora are one of nature's most beautiful light displays. They occur when earth's magnetic field traps charged particles from the solar wind. These energetic particles then collide with atoms in the atmosphere and cause them to emit light. The color of an auroral display is dependent upon the type of atoms affected.  The most common color is a green produced by emission from oxygen atoms at middle altitudes in the atmosphere. This is the color celebrated by Emerald & Ash in their polish Aurora. They describe it as: "a charming softened green shimmer with pops of red and green micro flakies and a slight touch of holo. Full coverage at 2-3 coats depending on your application." I love that they included the red and green microflakes because the second most common auroral display involves a mixture of red and green!

I used 2 thin coats of Aurora over a base of CND Stickey for these photos and no topcoat. Application was straight forward and trouble free. The polish has an incredible glow that is simply stunning and is strongly reminiscent of its namesake.

ottlight

sunlight

This next photo demonstrates how prominent the flakies can be when they pop into view. This polish has so much visual interest between the shimmer, the flakes and the holo, I just adore it!
sunlight

This is a photograph by Ole Salomonsen Photography who kindly agreed to let me use it here to show how wonderfully Emerald & Ash captured the look of the aurora in their polish. Their Facebook page is full of exquisite aurora photographs and is well worth a look! 


Aurora tend to be most commonly visible from high latitudes but can occasionally be seen from points farther south (or, more precisely, at lower latitudes). Here in Indiana I have seen them 5 times, but I am hampered by the fact that we have a lot of cloudy skies. It is always a thrill to see the elusive colors against the nighttime sky and I love that this polish lets me revisit that thrill on my fingertips whenever I wish.

Aurora is available from the Emerald & Ash website and you can get information about upcoming colors from their Facebook page.

Monday, March 10, 2014

Contrary Polish Dioptase


Dioptase is one of the polishes from the Contrary Polish On The Rocks Winter 2013 collection. Dioptase is also a deep green copper silicate mineral. It tends to be transparent or translucent, and Carrie has given its namesake polish a slightly sheer formula. It is a "bluish green with antique gold and green shimmer" and is a great color for Saint Patrick's Day for those of use who don't do well with the more yellow-y greens that are out there.

In these first pictures I am wearing 3 coats with no topcoat because the shine was so impressive without it. The first coat was rather patchy but the second coat evened things out and the third deepened the color and was almost but not quite enough to completely dispel a visible nail line. I had a teeny bit of trouble applying the polish because the brushes on the mini bottles sometimes are less than ideal but it just meant I had to take a little extra care during application to avoid the janky bristles.


sunshine, no topcoat

Sparkles!! sunshine, no topcoat

I then applied a layer of HK Girl topcoat just to help the manicure last longer on my nails. These next photos are with the topcoat and taken on the second day of wear. All of my photos are taken in sunlight mostly because I was so thrilled to see the sun and have a little bit of warm weather. That is going to change in a day or two and we will see more snow, but for now I am soaking up that solar radiation!

I really like this polish. While I tend not to wear a lot of green, this is a flattering color on me and there is a lot of understated sparkle.


sunlight, with topcoat

sunlight, with topcoat

And here is a photo of the mineral dioptase. Isn't it pretty?


Wikipedia image

You can learn more about Contrary Polish on her Facebook page. She has a number of stockists but also has mini size bottles available directly via her blog, which is where I purchased the bottle for this review.

Thursday, March 6, 2014

Emerald & Ash Deconstructed Daisy

In the process of become a nail polish nut, I have had the pleasure of meeting (virtually) some wonderful ladies who are polish makers. Among those ladies is Ashley, one of the geniuses behind Emerald & Ash Polish (the other is her physicist husband).  The polish I am featuring today was made in honor of her mom's memory and is called Deconstructed Daisy. The name is quite apt as it is features various glitters in white, green and yellow and does indeed look like a Shasta daisy broken down into its component parts.

The base polish I chose to use for this manicure is essie's Pink Diamond. I love the color but like many essie polishes it was a bit on the runny side and this one seems to take forever to dry. I managed to get a nick on my index finger several hours after applying the polish. It is a lovely soft, girly pink I think is particularly flattering on my skin tone however, and it has a soft glow that screams spring to me. I am wearing 3 coats here.


Ottlight

Now on to Emerald & Ash. This is the part where I usually give a disclaimer about how I don't really like glitter and am not particularly skilled at applying it and yet a quick review of my blog shows a remarkable number of posts featuring glitters. I think that is just because they seem to photograph more easily than plain polish. My favorite polish from E&A is a periwinkle holo named Trick, which is actually one of my favorite polishes of all time. It is an amazing holographic with a purple flash and blue/violet flakes. It has tremendous depth and color play on the nail but whenever I try to capture it on camera I end up with an unassuming purple polish. Sigh.


Trick. Soooo pretty in person!!


Deconstructed Daisy applied very well for me. I laid the brush on my nail and dabbed a bit rather than pulling the brush along the nail but didn't really have to place the glitters, they just came off the brush where you see them. This is one coat, topped with my usual HK Girl topcoat.


Ottlight

sunlight
I love how bright and cheerful this polish is. I am definitely ready for lighter, brighter colors after a long, cold winter!
sunlight


March 11th is the date celebrating the shop's Primary Circumgyration of its solar orbit (aka its first anniversary). It looks like there will be some celebrations happening on the Emerald & Ash Facebook page next week in honor of that, so you might want to give them a Like! You can find Deconstructed Daisy, Trick, and many more wonderful polishes at EmeraldandAsh.com.

Monday, March 3, 2014

Multiblogger Giveaway - now with pictures!

Multi Blogger Giveaway!

Prize Pack 1 from Glamour Granny (US only):

image

Carnival Glass, Poe and Vynails from Royal Lacquer.


image


Geirangerfjord and Trollveggan from Big Spoon Lacquers


Prize Pack 2 from BoomShakaLacquer (US only):


image


Nimue and Hecate from Daphine Polish


image
Hellebore and Fireweed from Alchemy Lacquers


image


Floor 500, Rose and the Dalek, Moon Over Paradise and Moisturize Me 
from Gothic Gala


image
 mystery prize from Ellagee


Prize Pack 3 from Les Essais Beauté de Schette (Worldwide):


image


$25 Dazzled gift certificate


Prize Pack 4 from The Crumpet (worldwide):

Llarowe gift certificate


Prize Pack 5 from Amanda Loves Polish (US only): 


image


Don't Panic and Calypso from Carpe Noctem Cosmetics


image


 Carnivale and unscented cuticle oil from Northern Star Polish


Prize Pack 6 from Decently Fashionable (US only):


image


 3 surprise polishes from Pretty Bitch

image


 mystery nail art package from Decently Fashionable


Prize Pack 7 from Short Nails Need Love Too (US only):

image
A Star to Sail By and Maui from Indigo Bananas
Sweet Tart and a mini glass file from Model City Polish


Prize Pack 8 from From Lips 2 Tips Mommy Style (US only):


$10 gift certificate to Ruby White Tips


2 surprise polishes from ZR's Polish


2 minis of choice from Marbles for Polish


Multiblogger Giveaway!

I recently joined a Facebook group for folks who swatch and blog about Indie polishes in the hope that it might help me improve my technical skills and frequency of posting. We decided to put together a multiblogger giveaway and I am participating along with SchetteEssaiBeautethe Glamour GrannyThe CrumpetBoom Shaka LacquerDecently Fashionable, and Amanda Loves Polish. This giveaway will run for 3 weeks and is open to both US and International entrants. I will update with pictures of the prize packs later today.


Click the link below to be taken to the Rafflecopter page and enter. Good luck!


Sunday, March 2, 2014

Indigo Bananas A Star To Sail By

A Star to Sail By is a polish from Indigo Banana's "Paradise" collection based on a Willy Wonka theme. The name comes from Wonka's quotation of a line from the beautiful and evocative John Masefield poem "Sea Fever". The polish is equal to the task of bearing that name as it captures the lambent glory of starshine on one's fingertips! I had several people compliment me on my nails while I was wearing this which is something of a rarity for me. It is stunning and as usual, my feeble attempts at photography do it no justice. 

Andrea describes A Star To Sail By as "a smooth, flat silver flake (not glitter) based polish that looks like white gold that leans slightly rosy (paler than true rose gold, but pinker than white gold). This polish is a complex mix of multiple gold flakes, pink flakes, pink to gold flakes, microshimmers and holo microshimmer, with the bulk of it being a real silver metal flake". Whew! It certainly has a lot going on! And yet it all mellows out into a soft glow on the fingertips. This is another polish where I keep being distracted by the flashes of light at the ends of my fingers. Beautiful! 


I started out with two coats of OPI My Very First Knockwurst because I wanted a neutral base. I then added three very thin layers of A Star to Sail By. You can see in the following photo that I didn't quite get complete coverage with those 3 coats but it honestly is only apparent in photos. In real life, the polish looks more metallic than glitter-y. 


Application of this polish was quite straightforward - the silver flakes lay flat and spread normally. I used one coat of HK Girl topcoat and a base of CND Stickey. Cleanup was a little more involved than for a "normal" polish. I ended up with flakes clinging to my fingers along the sides of my cuticles after using my polish remover but just used a bit of sugar scrub on my hands and that cleaned them up quite easily. 


I am admittedly a big fan of all of Indigo Bananas polishes but this one is a standout to me. The metallic flakes are incredibly reflective and the delicate rose gold color is very flattering. As I mentioned earlier, several people remarked on how eye-catching my nails looked while I was wearing it and I don't get those sorts of comments very often, let alone from multiple sources. Finally, I received this bottle as a gift from a friend so that does make it a little more special. (please note that its gift status did not affect my impartial reviewing of the polish, just my warm fuzzies while wearing it!)

Indigo Bananas polishes can be purchased on her Etsy page. You can follow her on Facebook and Instagram for updates.


Tuesday, February 11, 2014

Enchanted Polish January 2014

This is going to be a rather odd post format, at least initially. Because Enchanted Polish January 2014 is a Mystery Color and there are folks out there who do not wish to have the surprise spoiled, I am going to have my pictures set up as imgur links so you can click through to them if you want but they won't pop up on any feeds to spoil the surprise for those wishing to remain in the dark. After everyone has received their polish I will edit the page to show the picture but for now, you are going to have to work for them! However, reader be warned - I am going to be discussing the polish in the body of the post so skedaddle if you don't want to know any more.


Here, have a photo of an adorable sleeping kitty to take up a little space…


January 2014 is part of the monthly series of polishes from Enchanted and was available as a preorder. Some people had trepidation about purchasing a polish sight-unseen but the advantage of being an Enchanted Addict is that I knew I would have to have it regardless of what it looked like. Fortunately, the color is lovely and most people seem to be very happy with it. I have seen it described as a blackened teal or a dark grey but to my eye it looks like a navy. Whatever you want to call it, it is dark and mysterious and somewhat dusty with a nice amount of holo.

The holo really pops in the sunshine as you can see here.


Indoors the color is muted but beautiful and note that there is no topcoat in the following photo. That brilliant shine is innate to the polish.


It seemed to me that Enchanted Polish To Die For would be perfect to go over January. Unfortunately, it seems to almost get lost amidst the holo. In low light however, To Die For lends a subtle sparkle to January.


January had the lovely formula I have come to expect from Enchanted Polish. These pictures show one coat of January on its own or topped with one coat of To Die For. Chelsea hinted that this will be the year of mystery polishes so it will be interesting to see how people react to that. So far both Mystery colors she has offered (Holiday and January 14) have been quite pretty but I can see how people who aren't avid collectors might be reluctant to take the chance on them. On the other hand, if she continues to offer her polishes as pre-orders it should make them considerably easier to obtain once the color is revealed since the supply issues won't be quite as bad as they have been with the limited amounts from the regular restocks.

Enchanted Polish can be purchased from the Big Cartel site. Sign up for the mailing list on that page to learn when the next restock will happen.